Backup your Pieces Database
Backing up your Pieces Database is a crucial step to ensure you don’t lose any of your code snippets. This guide will walk you through how to easily back up and restore your Pieces Database within the Pieces Desktop App.
When you finish working on your personal computer for the day, make sure to back up your Pieces Database. Later, when you switch to your work device, restore the database there. Similarly, after finishing work on your work device, back up the database, and then restore your personal device from the latest backup.
Creating a Backup
- Using the Settings Menu
- Using the Power Menu
- Open the Pieces Desktop App.
- Click on your profile icon in the top-right corner of the app.
- Select
Backup & Restore Database. - In the pop-up window, click on the
Create Backupbutton.
- Open the Pieces Desktop App.
- Use
⌘/CTRL + SHFT + Por⌘/CTRL + Enterto open thePower Menu. - Search for
Backup & Restore Databaseand select it. - In the pop-up window, click on the
Create Backupbutton.
Restoring a Backup
- Using the Settings Menu
- Using the Power Menu
- Open the Pieces Desktop App.
- Click on your profile icon in the top-right corner of the app.
- Select
Backup & Restore Database. - In the pop-up window, find the backup you want to restore and click on the
Restorebutton.
- Open the Pieces Desktop App.
- Use
⌘/CTRL + SHFT + Por⌘/CTRL + Enterto open thePower Menu. - Search for
Backup & Restore Databaseand select it. - In the pop-up window, find the backup you want to restore and click on the
Restorebutton.
Deleting a Backup
- Using the Settings Menu
- Using the Power Menu
- Open the Pieces Desktop App.
- Click on your profile icon in the top-right corner of the app.
- Select
Backup & Restore Database. - In the pop-up window, find the backup you want to delete and click on the
Deletebutton.
- Open the Pieces Desktop App.
- Use
⌘/CTRL + SHFT + Por⌘/CTRL + Enterto open thePower Menu. - Search for
Backup & Restore Databaseand select it. - In the pop-up window, find the backup you want to delete and click on the
Deletebutton.
Offline Backup
Manual backups are ONLY compatible with the same and future versions of Pieces OS and Pieces Desktop as when it was created. If it was created with Pieces OS 1.9.1 and Pieces Desktop 1.9.2, then it is compliant with those same versions and all future versions when restoring the backup.
Please note that you CANNOT go backward in versions. For example: on one computer you have Pieces OS 1.9.3 and Pieces Desktop 1.9.4, and you attempt to restore this database on Pieces OS 1.9.0 and Pieces Desktop 1.9.1, this will fail and your Pieces OS will NOT function properly. To resolve this please first update your version to the latest on Pieces Desktop and Pieces OS and then repeat the restoration process.
Creating an Offline Backup
Step 1: Quit Pieces OS and Pieces Desktop
Please quit Pieces OS and Pieces Desktop and make sure neither are actively running.
- macOS
- Windows/Linux
- To quit Pieces OS, open the Pieces OS toolbar app towards the top of your Desktop and select
Quit - To quit Pieces Desktop, select
Piecesin the top-left of your macOS toolbar and selectQuit
- To quit Pieces OS, right-click the Pieces OS taskbar app and select
Quit - To quit Pieces Desktop, click the
Xin the top-right corner of the Pieces Desktop window
Step 2: Locate your Pieces Database
- macOS
- Windows
- Linux
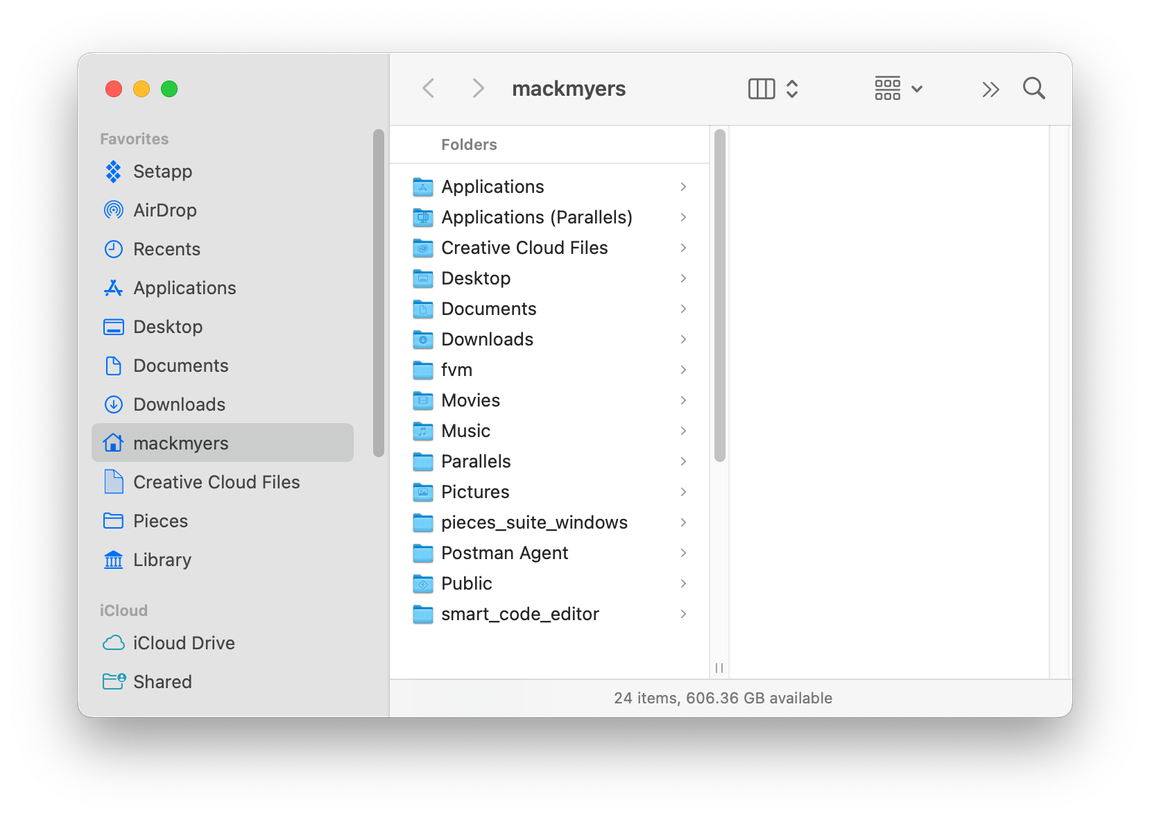
Open your Finder and navigate to your Home folder.
If you cannot see your Home folder on the left-hand side of your Finder, simply tap Shift+Cmd+H to open it

Open your File Explorer and navigate to the following location: C:/Users/{username}
Open your File Explorer and navigate to the following location: ~/Users/{username}
Step 3: Locate your Pieces Database
- macOS
- Windows
- Linux
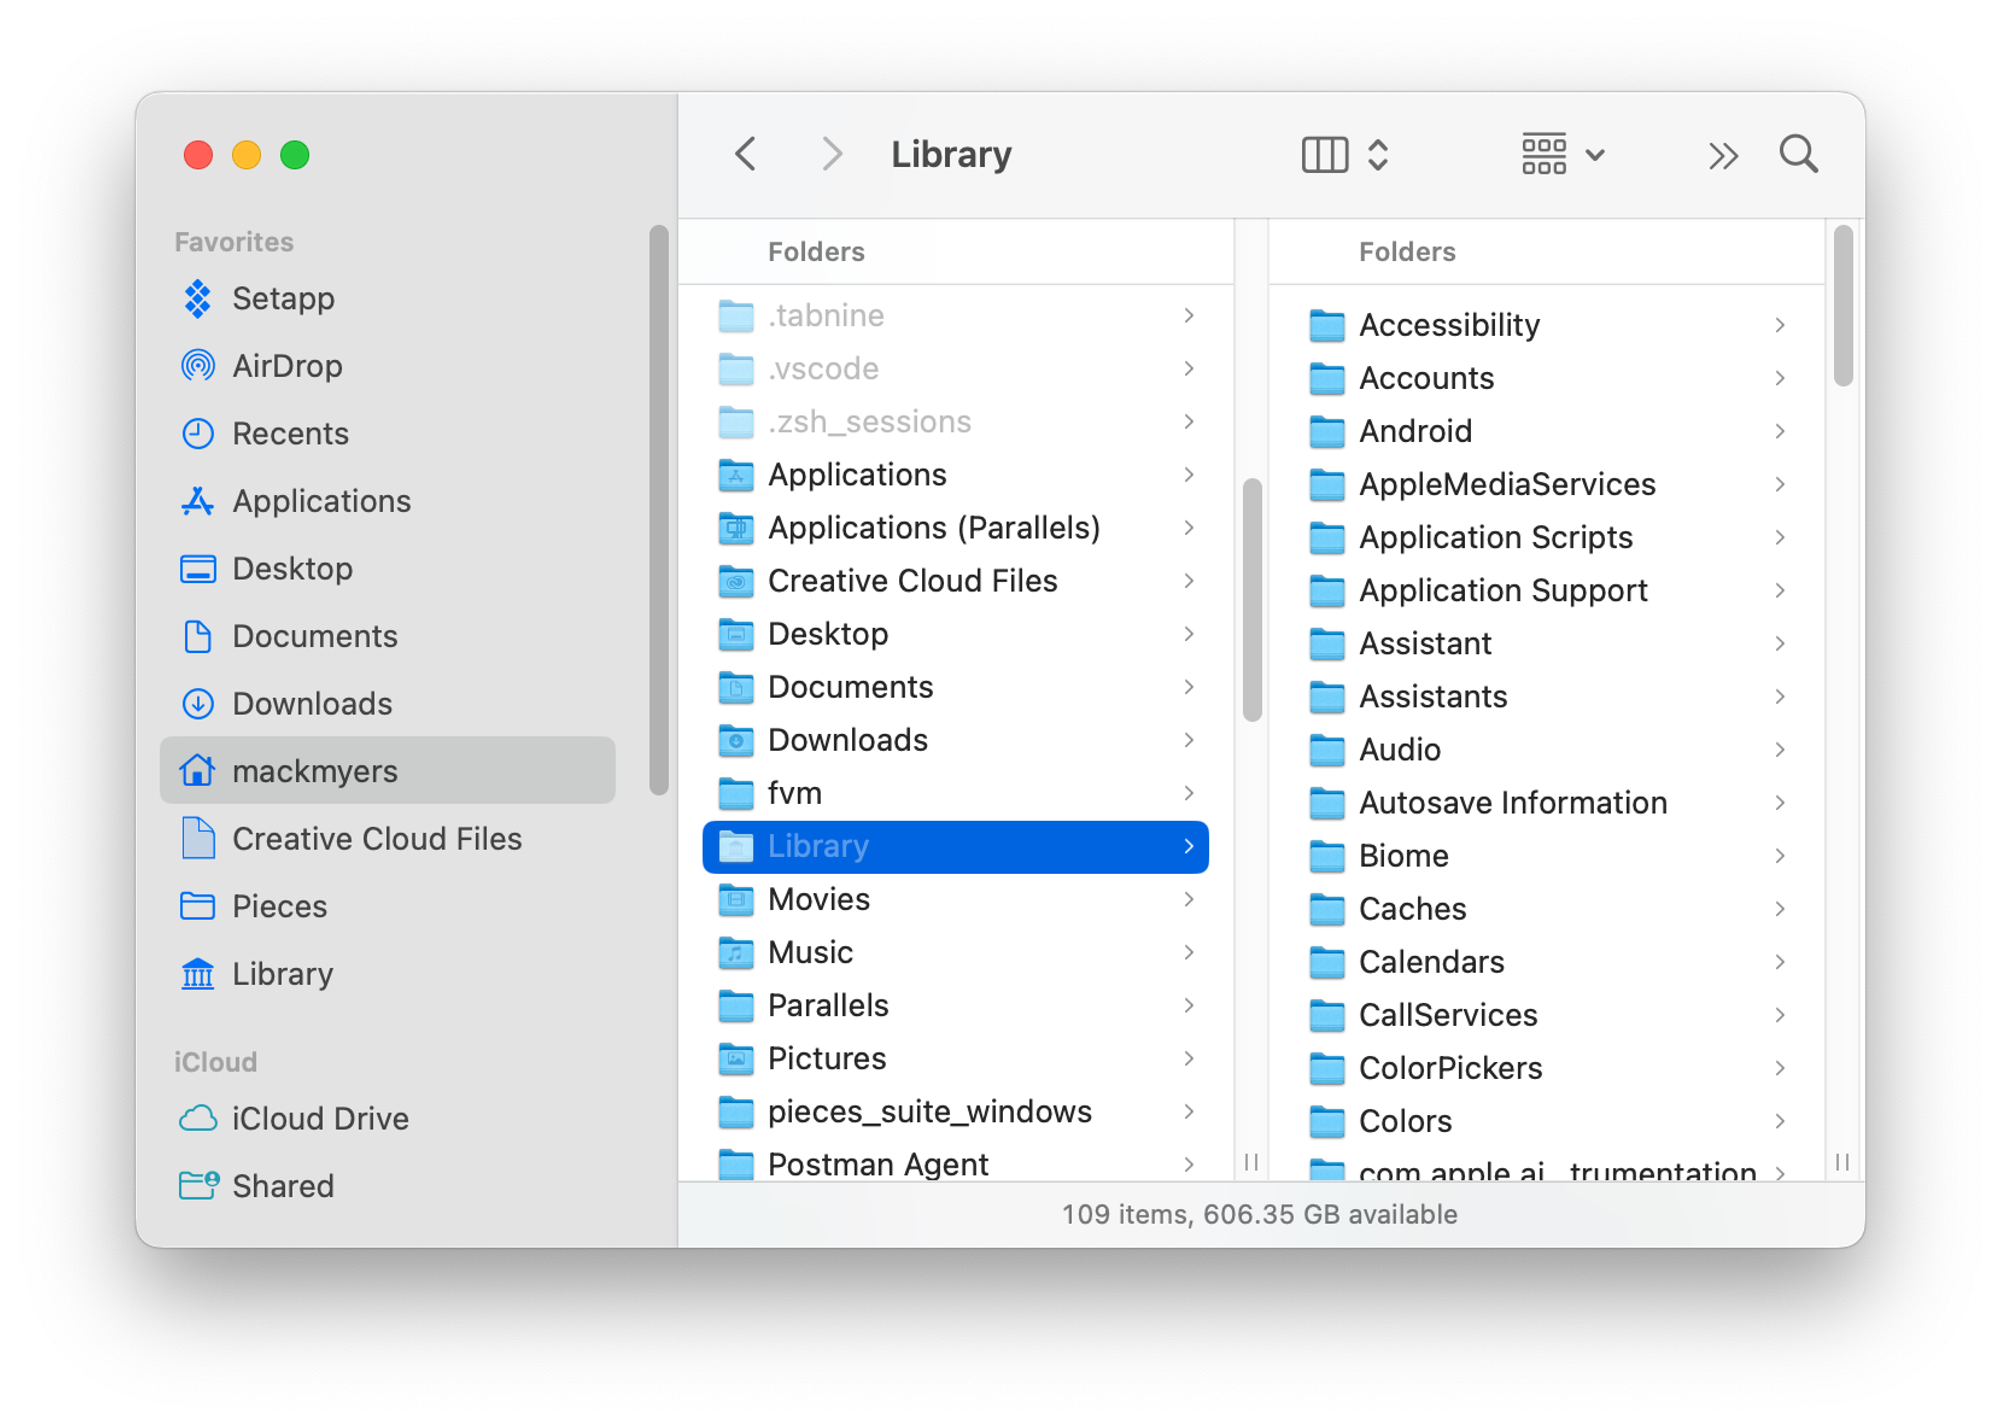
Once in your Home folder, you’ll need to click Shift+Cmd+. (shift, command, period) to show your hidden files & folders. Once they are visible, find your Library folder and click it.

Once in your {username} folder, you'll need to find your Documents folder and click it.
You may need to enable the option to show hidden files and folders. To do this, open File Explorer, click on the View tab, and check the box next to Hidden items.
You should now be at the following location: C:/Users/{username}/Documents
Once in your {username} folder, you'll need to find your Documents folder and click it.
You may need to enable the option to show hidden files and folders. To do this, open File Explorer, and tap Ctrl+H.
You should now be at the following location: ~/Users/{username}/Documents
Step 4: Locate your Pieces Database
Next, locate the folders titled com.pieces.os and com.pieces.pfd. These folders represent your Pieces OS & Pieces Desktop databases.
Step 5: Compress the folders
- macOS
- Windows
- Linux
Select both folders (com.pieces.os and com.pieces.pfd), right-click, and select Compress.
Select both folders (com.pieces.os and com.pieces.pfd), right-click, select Send to, and then select Compressed (zipped) Folder.
Select both folders (com.pieces.os and com.pieces.pfd), right-click, and select Compress.
This may take some time, especially if you have any local LLMs downloaded. If you do have any local LLMs downloaded, you may cancel the compression, open Pieces Desktop App, and delete the local LLMs you have downloaded. However, you MUST restart the guide from Step 1 if you choose to do this.
Step 6: Rename the Zip file
This will create a new Zip file titled, Archive. From here, you can enter a new name. We recommend naming this, pieces_backup_(month)_(day)_(year).
From here, you can place this Zip file anywhere you desire, whether it be another folder on your machine or in cloud storage such as Google Drive, Dropbox, or OneDrive.
Backups are ONLY compatible with the same and future versions of Pieces OS and Pieces Desktop as when it was created. If it was created with Pieces OS 1.9.1 and Pieces Desktop 1.9.2, then it is compliant with those same versions and all future versions when restoring the backup.
Please note that you CANNOT go backward in versions. For example: on one computer you have Pieces OS 1.9.3 and Pieces Desktop 1.9.4, and you attempt to restore this database on Pieces OS 1.9.0 and Pieces Desktop 1.9.1, this will fail and your Pieces OS will NOT function properly. To resolve this please first update your version to the latest on Pieces Desktop and Pieces OS and then repeat the restoration process.
Restoring the External Backup
Step 1: Quit Pieces OS and Pieces Deskto[]
Please quit Pieces OS and Pieces Desktop and make sure neither are actively running.
-
To quit Pieces OS, open your system tray in the bottom-right corner of your Desktop, then right-click the Pieces OS icon, and select
Quit. -
To quit Pieces Desktop, right-click the app icon in your system toolbar and select
Quit.
Step 2: Locate the compressed backup file
Locate the compressed Zip folder containing both your com.pieces.os and com.pieces.pfd backups.
Step 3: Navigate to your Pieces Database
- macOS
- Windows/Linux
Navigate back to the Library folder either on the same or your different machine.
Navigate back to the Documents folder either on the same or your different machine.
Step 4: Unzip the compressed backup file
Unzip the compressed backup file.
Step 5: Replace the existing database
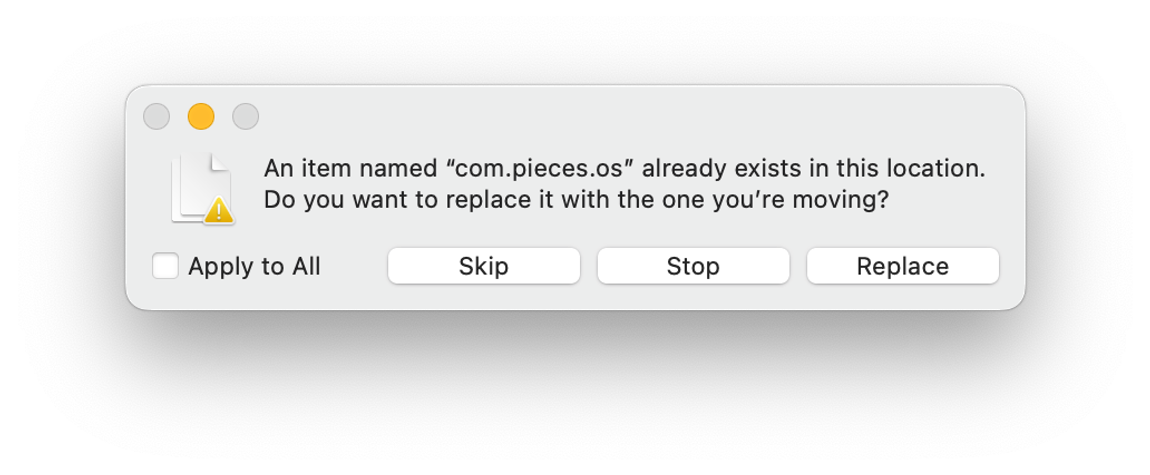
This next step is critical. If you have an existing Pieces database already located in your current folder on your device, you will see a window similar to what’s shown below.

This step is asking if you’d like to override the existing database with your backup.
- If you’d like to override, select
Replace the files in the destination - If you don’t want to override, abandon the process by pressing
Stop
Step 6: Restart Pieces OS and Pieces Desktop
Lastly, if you chose to proceed with restoring the backup, you will need to restart both Pieces OS and Pieces Desktop for the changes to take effect.
Support
As always, if you run into issues or have feedback, please fill out this quick form or email us at support@pieces.app, and we’ll be in touch as soon as possible!